Showing posts with label Security. Show all posts

Saturday, 8 June 2013

Setting up dnscrypt on Fedora

DNSCrypt is a free service by OpenDNS that provides encrypted DNS lookups. If you are concerned about man-in-the-middle attacks, data collection/spying by various entities or ad injections by unscrupulous ISPs, encrypting your DNS lookups is a good starting point. Bear in mind that just encrypting your DNS lookups will not make you secure online. It has to be used in conjunction with a lot of other tools and services if you really want to safeguard your privacy.

  1. Download the DNSCrypt tarball from http://download.dnscrypt.org/dnscrypt-proxy/ . At the time of writing, the latest version was dnscrypt-proxy-1.3.0.tar.gz
  2. tar xvf dnscrypt-proxy-1.3.0.tar.gz && cd dnscrypt-proxy-1.3.0
    ./configure
    make -j4
    sudo make install
    
  3. Create a new system user to run the service:
    sudo adduser -m -N  -r -s /bin/false dnscrypt
  4. Now start the service in the foreground to make sure everything is working:
    sudo dnscrypt-proxy -u dnscrypt
  5. Change your system DNS server to 127.0.0.1. There are many ways to do this. The adventurous can edit the appropriate script in /etc/sysconfig/network-scripts/. If you don't have NetworkManager installed, editing /etc/resolv.conf would work too. Gnome users: click on the network icon, click 'Network Settings', select the connection and click 'Options'. Then in the 'IPv4 Settings' tab, set the 'Method' to 'Automatic (DHCP) Addresses Only' and type in 127.0.0.1 in the 'DNS Servers' text box.
  6. Restart network service for the DNS server changes to take effect.
    sudo systemctl restart network.service
  7. Now you can verify that the changes have taken effect by running dig google.com and checking the output for the line: SERVER: 127.0.0.1#53(127.0.0.1). Alternatively, navigate to http://www.opendns.com/welcome/ using a web browser. The screen will tell you whether you are using OpenDNS or not.
To run the dnscrypt-proxy service on system startup, create a systemd service as follows:
  1. As root, create the file /etc/systemd/system/dnscrypt.service with the following content:
  2. Refresh the system daemon:
    sudo systemctl daemon-reload
  3. Now the dnscrpyt service will start automatically on every boot. You can manually start or stop the service by issuing the usual systemctl commands as well.
    sudo systemctl start dnscrypt.service

Monday, 6 July 2009

Truecrypt 6.2 install guide for Fedora 11

For Truecrypt 6.2, nothing much has changed from the Truecrypt 6.1 install process except for the line numbers that need to be modified to make the source compile correctly.

1. Download the TrueCrypt 6.2 source tarball from www.truecrypt.org
2. Untar the source
tar xvf TrueCrypt\ 6.2a\ Source.tar.gz
3. Install required libraries
sudo yum install nss-pkcs11-devel fuse-devel wxGTK wxGTK-devel
You might also need the following packages if you haven't installed them already.
sudo yum install gnome-keyring-devel gcc-c++
4. Export the Cryptoki include folder
export PKCS11_INC=/usr/include/gp11
5. Run make
make
You may get the following error messages:
../Common/SecurityToken.cpp:660: error: ‘CKR_NEW_PIN_MODE’ was not declared in this scope
../Common/SecurityToken.cpp:661: error: ‘CKR_NEXT_OTP’ was not declared in this scope

5.1 Open Common/SecurityToken.cpp in your favourite editor.
5.2 Scroll to line 660
5.3 Comment out line 660 and 661. It should look like this:
//TC_TOKEN_ERR (CKR_NEW_PIN_MODE)
//TC_TOKEN_ERR (CKR_NEXT_OTP)

5.4 Save and exit
5.5 Run make again
[Some people may not like to fiddle with code like this. But these two lines are only used to generate error messages. At the very worst, you will end up getting a generic error message instead of a more focussed one. ]
6. TrueCrypt is now compiled. You can find the executable inside the folder titled 'Main'. You might want to make it available from your bin directory for easy access.
sudo cp Main/truecrypt /usr/share/bin

All done!

Tuesday, 9 December 2008

TrueCrypt 6.1 Install Guide For Fedora 10

Compared to previous versions, installing TrueCrypt 6.1 on Fedora 10 was quite straightforward. Here is a quick list of steps to follow:

1. Download the TrueCrypt 6.1 source tarball from www.truecrypt.org
2. Untar the source
tar xvf TrueCrypt\ 6.1a\ Source.tar.gz
3. Install required libraries
sudo yum install nss-pkcs11-devel fuse-devel wxGTK wxGTK-devel
EDIT: You might also need the following packages if you haven't installed them already. (Thanks Vin).
sudo yum install gnome-keyring-devel gcc-c++
4. Export the Cryptoki include folder
export PKCS11_INC=/usr/include/gp11
5. Run make
make
You may get the following error messages:
../Common/SecurityToken.cpp:654: error: ‘CKR_NEW_PIN_MODE’ was not declared in this scope
../Common/SecurityToken.cpp:655: error: ‘CKR_NEXT_OTP’ was not declared in this scope

5.1 Open Common/SecurityToken.cpp in your favourite editor.
5.2 Scroll to line 654
5.3 Comment out line 654 and 655. It should look like this:
// TC_CASE_STR (CKR_NEW_PIN_MODE);
// TC_CASE_STR (CKR_NEXT_OTP);
5.4 Save and exit
5.5 Run make again
[Some people may not like to fiddle with code like this. But these two lines are only used to generate error messages. At the very worst, you will end up getting a generic error message instead of a more focussed one. ]
6. TrueCrypt is now compiled. You can find the executable inside the folder titled 'Main'. You might want to make it available from your bin directory for easy access.
sudo cp Main/truecrypt /usr/share/bin

All done!

Friday, 26 September 2008

Anonymous browsing with Tor and Privoxy

The Onion Router which is most commonly known as Tor, is a wonderful tool for anonymizing your online activity. Tor consists of public proxies setup by trusted members of the Tor community, who allow other users to make use of their proxies to browse the web. In a typical Tor session, there are at least 3 proxies involved, making it very difficult to trace back any online activity to a single user. Furthermore, the communication between the client and the proxies are tunnelled in layers, providing protection against casual snooping as well.

Setting up Tor on Linux was surprisingly easy. Tor binaries are available in the Fedora repositories, so just simply type
sudo yum install tor

Once installed, invoke Tor by typing
tor

The Tor client will start up and attempt to establish a proxy chain. Once this is complete, it will start a SOCKS proxy on port 9050. To Torrify any application, you simply have to configure it to use the proxy server created by Tor at 127.0.0.1:9050.

If you want to completely anonymize your browsing, there's an additional step involved. Usually applications such as web browsers do not use the SOCKS proxy to tunnel DNS queries. This can lead to information leakage because anyone listening in can see by the DNS query that you're attempting to visit that certain site. Therefore even if your data is secure, your browsing history is not.

The simplest solution is to use a HTTP proxy such as Privoxy and configure it to use Tor. This way you can achieve quite a good level of anonymity online without any hassle.

Privoxy is also available in the repositories, so installation is a breeze.
sudo yum install privoxy
Afterwards, you need to configure it to forward requests through Tor.
sudo echo "forward-socks4a / 127.0.0.1:9050 ." >> /etc/privoxy/config
Start the Privoxy daemon by typing
sudo privoxy /etc/privoxy/config

Configure your browser to use an HTTP proxy at 127.0.0.1:8118 and restart it. If everything went smoothly, you're now browsing anonymously. The best way to see this in action is to open up www.google.com. Depending on the location of the Tor exit node, you will be served with a Google page for that specific region. For example, when I tried it, I was served the Google Denmark page because my Tor exit node was in Denmark. You can also use tools like http://whatismyipaddress.com/ to see how your IP has changed completely due to Tor.

The internet is a wild place. If you are worried about privacy, give Tor a spin. It's definitely a good tool to have handy.

Thursday, 24 July 2008

Encrypted removable storage with Fedora 9

Linux Unified Key Setup (LUKS) is a way to create encrypted disk partitions on Linux. It has been around for a while now, and Fedora 9 provides LUKS support out of the box. Encrypted partitions can be configured to be unlocked with several passphrases, allowing many users to share the partition. Disk access speeds are almost comparable to that of unencrypted disks. Best of all, LUKS is cross-platform. Even Windows users are able to use an encrypted partition created with LUKS.

The number of material on the net about creating LUKS partitions is surprisingly low. The few link I checked out only detailed how to setup permanent encrypted partitions that got mounted at every bootup. My requirement was to encrypt an external hard-drive that I use for backup purposes, therefore I set out to find out the process of encrypting a removable disk on my own. I was helped along the way by http://fedoraproject.org/wiki/Security_Guide/9/LUKSDiskEncryption and http://www.saout.de/tikiwiki/tiki-index.php?page=EncryptedDeviceUsingLUKS


Step 1:
Change in to the single user mode.

telinit 1

Step 2:
Check whether the drive is still mounted. (My drive is plugged in to /dev/sdb. Yours may vary)
mount | grep sdb
Unmount the drive if it is still mounted.
umount /dev/sdb

Step 3 (Optional):
For maximum security, the drive must be filled with random data. This can be done in two ways. Both methods are effective, but take a long time. You will possibly have to leave the process overnight to complete. Be warned; this step will OVERWRITE ALL DATA on the disk.

Method 1:
Use dd to write data from /dev/urandom. Make sure you type it correctly. If you type /dev/random by mistake, your grand-kids will be wrinkled and toothless by the time it finishes.
dd if=/dev/urandom of=/dev/sdb

Method 2:
Suggested by LUKS wiki. Kills two birds with one stone by writing random data to the disk and checking it for errors at the same time.
badblocks -c 10240 -s -w -t random -v /dev/sdb


Step 4:
Create the LUKS partition.
cryptsetup --verbose --verify-passphrase luksFormat /dev/sdb

Step 5:
Load the logical encrypted device.
cryptsetup luksOpen /dev/sdb my_enc_drive
This command will create /dev/mappers/my_enc_drive. You can provide any name you like in place of "my_enc_drive". To check whether the command succeeded, type:
ls -l /dev/mappers
You should see a new entry titled "my_enc_drive" in the output.

Step 6:
Create the file system. You can choose any file system you like. Be aware of permission problems when using secure file systems such as ext3. In this case, I am creating an ext3 file system on the encrypted disk.
mkfs.ext3 /dev/mapper/my_enc_drive

Step 7:
Mount the drive.
mount -t ext3 /dev/mapper/my_enc_drive /media/my_enc_drive

If everything went successfully, your encrypted file system is ready now. Reboot the computer to bring up the desktop and plug the drive in. It is automatically recognized as an encrypted drive and you will be prompted for a password.
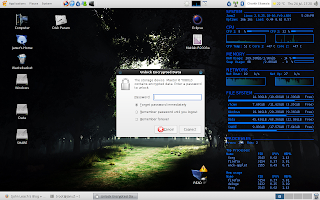


In theory, the drive should be mounted automatically after you enter the password. But on my machine, the entry to /dev/mapper was automatically created, but the drive wasn't mounted automatically. I still haven't found the reason for this behaviour, but it is only a minor setback. The drive can be used without any problem by manually mounting it.
sudo mount -t ext3 /dev/mapper/luks_crypto_8e8d6392-7be3-4964-8e6d-9de57e886fa5 /media/my_enc_drive
" luks_crypto_8e8d6392-7be3-4964-8e6d-9de57e886fa5" is the name automatically generated by the HAL daemon. Yours will definitely be different.

To unmount the drive after using it. Simply type:
sudo umount /media/my_enc_drive
sudo cryptsetup luksClose luks_crypto_8e8d6392-7be3-4964-8e6d-9de57e886fa5


LUKS can be a viable alternative to TrueCrypt. The disk access speeds seem much better compared to TrueCrypt, at least on my machine. Best of all, LUKS comes pre-installed with Fedora 9. Therefore you don't need to struggle with getting the sources and compiling TrueCrypt.

Sunday, 13 July 2008

Secure File Deletion With srm

On any operating system, files deleted using the built-in file deletion utilities are never really deleted. Behind the scenes, deletion is simply a matter of removing the file from the directory entry and adding the blocks occupied by the file to the free block list. The file still exists on the disk like a ghost. The OS might reuse some of the blocks for another file, but it's not guaranteed that the whole file will get overwritten, therefore enough sensitive data from deleted files can be recovered with even the simplest of utilities. Even if all the blocks get casually overwritten, there are sophisticated methods that can be employed by a determined attacker to recover most of the overwritten data from a hard drive platter.

srm is a project that attempts to provide secure file deletion options to the familiar rm command used in all Unix derivatives. srm is fully compatible with the regular rm command, therefore there's no learning curve involved. There are 3 options for secure deletion.
  • -s, --simple : Simple one pass overwriting with random data. (Least secure option.)
  • -P, --openbsd : Emulates OpenBSD behaviour by overwriting in 3 passes.
  • -D, --dod : Conforms to the US DoD specification of overwriting in 7 passes.
Installation is a simple affair. Download the tar ball, extract, configure, make, make install, and you're set.

Although it is dificult to guarantee total security, srm is a good open source solution for normal users who wish to keep their data private. A determined government agency might still get to your data, but certainly not your pesky script-kiddie cousin.

Monday, 7 July 2008

TrueCrypt 6.0 on Fedora 9

TrueCrypt 6.0 was released on 4th of July. The new version has many improvements, the most important ones being parallelized encryption/decryption and hidden volume support for Linux and MacOS. Parallelized encryption/decryption makes use of multiple cores to speed up the process, therefore TrueCrypt on a dual core machine would be twice as fast compared to a machine with a single core processor. The new version for Linux also makes use of the native kernel cryptographic services for the XTS mode, making disk accesses almost as fast as normal disk accesses. Full feature list for TrueCrypt 6.0 can be found at http://www.truecrypt.org/docs/?s=version-history

Since there are no binaries for Fedora, TrueCrypt has to be compiled from the source. The process is quite straight forward and hasn't changed since the last release. The sources have been fixed with the correct includes, so this version will not spill out compiler errors.

TrueCrypt 6.0 is a worthy update that will make your disk encryption process more streamlined.

Tuesday, 27 May 2008

Installing TrueCrypt in Fedora 9

[This article has been updated for Fedora 10. Go over to http://penguinenclave.blogspot.com/2008/12/truecrypt-61-install-guide-for-fedora.html to see the new version]
TrueCrypt (http://www.truecrypt.org/) is a popular free on-the-fly disk encryption software that can encrypt files, partitions, whole disks and even a windows installation. It is an extremely useful and important tool if you wish to keep personal and confidential data from being accessed by unauthorized people. TrueCrypt even supports plausible deniability, allowing you to hide an encrypted volume inside another volume. TrueCrypt volumes are indistinguishable from random data, so an adversary cannot prove that you have a TrueCrypt volume hidden inside a dummy encrypted volume.
Unfortunately, the TrueCrypt website only provides binaries for Ubuntu and OpenSuSE, so for those of us running other distros, the only option is to compile from source. The steps below outline the installation procedure on a Fedora 9 machine.

For an advanced encryption utility, TrueCrypt is surprisingly light on size and dependencies. Download the TrueCrypt sources from http://www.truecrypt.org/downloads2.php (Select Mac OS X / Linux (.tar.gz) from the combo box and tick the check box to agree to the license agreement before clicking the Download button) and wxWidget sources from http://sourceforge.net/project/showfiles.php?group_id=9863 (You only need the wxGTK bundle).

Step 1:
Install the fuse libraries.
sudo yum install fuse-devel

Step 2:
Untar the sources.
tar xvf TrueCrypt\ 5.1a\ Source.tar.gz
tar xvf wxGTK-2.8.7.tar.gz


Step 3:
Build the wxWidgets sources for TrueCrypt.
cd truecrypt-5.1a-source/
make WX_ROOT=../wxGTK-2.8.7 wxbuild

Edit:An anonymous commenter pointed out that passing a relative path to WX_ROOT resulted in compilation errors. If you have the same problem, provide the full path to wxGTK.
make WX_ROOT=/home/januz/Downloads/wxGTK-2.8.7 wxbuild


Step 4:
Build TrueCrypt.
gcc 4.3 is very strict during compilation, therefore you will encounter compilation errors with a message similar to "‘memcpy’ was not declared in this scope". The fix is to simply add
#include <cstring> to each of the following files:
  • Platform/Memory.cpp

  • Volume/EncryptionTest.cpp

  • Core/FatFormatter.cpp

I have created a patch file with the above changes which can be found here. To apply the patch, run the following command:
patch -p1 < truecrypt5.1.patch
Once the sources are patched, compile TrueCrypt by typing
make

Step 5:
Once make has finished running, the TrueCrypt executable can be found inside the Main directory. Simply copy it to your bin folder to add it to the executable path.
cp Main/truecrypt ~/bin

That's it ! TrueCrypt is quite intuitive and easy to use. But if you're in doubt, have a look through http://www.truecrypt.org/docs/ which has very detailed instructions on getting started.