Showing posts with label Fedora. Show all posts

Saturday, 8 June 2013

Setting up dnscrypt on Fedora

DNSCrypt is a free service by OpenDNS that provides encrypted DNS lookups. If you are concerned about man-in-the-middle attacks, data collection/spying by various entities or ad injections by unscrupulous ISPs, encrypting your DNS lookups is a good starting point. Bear in mind that just encrypting your DNS lookups will not make you secure online. It has to be used in conjunction with a lot of other tools and services if you really want to safeguard your privacy.

  1. Download the DNSCrypt tarball from http://download.dnscrypt.org/dnscrypt-proxy/ . At the time of writing, the latest version was dnscrypt-proxy-1.3.0.tar.gz
  2. tar xvf dnscrypt-proxy-1.3.0.tar.gz && cd dnscrypt-proxy-1.3.0
    ./configure
    make -j4
    sudo make install
    
  3. Create a new system user to run the service:
    sudo adduser -m -N  -r -s /bin/false dnscrypt
  4. Now start the service in the foreground to make sure everything is working:
    sudo dnscrypt-proxy -u dnscrypt
  5. Change your system DNS server to 127.0.0.1. There are many ways to do this. The adventurous can edit the appropriate script in /etc/sysconfig/network-scripts/. If you don't have NetworkManager installed, editing /etc/resolv.conf would work too. Gnome users: click on the network icon, click 'Network Settings', select the connection and click 'Options'. Then in the 'IPv4 Settings' tab, set the 'Method' to 'Automatic (DHCP) Addresses Only' and type in 127.0.0.1 in the 'DNS Servers' text box.
  6. Restart network service for the DNS server changes to take effect.
    sudo systemctl restart network.service
  7. Now you can verify that the changes have taken effect by running dig google.com and checking the output for the line: SERVER: 127.0.0.1#53(127.0.0.1). Alternatively, navigate to http://www.opendns.com/welcome/ using a web browser. The screen will tell you whether you are using OpenDNS or not.
To run the dnscrypt-proxy service on system startup, create a systemd service as follows:
  1. As root, create the file /etc/systemd/system/dnscrypt.service with the following content:
  2. Refresh the system daemon:
    sudo systemctl daemon-reload
  3. Now the dnscrpyt service will start automatically on every boot. You can manually start or stop the service by issuing the usual systemctl commands as well.
    sudo systemctl start dnscrypt.service

Monday, 14 November 2011

Enable graphical plymouth boot in Fedora 16 with nvidia drivers

Installation of nvidia drivers under Fedora is well documented. (See http://forums.fedoraforum.org/showthread.php?t=204752). In previous versions of Fedora, enabling the plymouth graphical boot was quite easy. All one had to do was to add the following kernel arguments to grub.conf.
rdblacklist=nouveau nomodeset vga=ask

Starting from release 16, Fedora uses Grub2 as the bootloader. The unfortunate side effect of this change is that the vga parameter is now obsolete. I absolutely hate the ugly text based boot screen - but going back to the nouveau driver was not an option. (Simply because I am stubborn like a mule). So after a lot of tinkering, here's how I managed to get back the graphical boot screen.

DISCLAIMER: Modifying Grub configuration files could make your system unbootable. Proceed at your own risk.
  1. Find the video modes supported by the vbe driver. To do this, press "c" at the grub menu to launch the grub console and run the following commands:
    set pager=1
    insmod vbe
    vbeinfo
    

    vbeinfo command will list all the accessible video modes it finds. Choose one that you like. Eg. 1280x800x24. Press ESC to exit the console and hit ENTER to boot the OS.

  2. Create a Grub2 font. I chose the excellent DejaVu font as the example here. Feel free to choose a different font in it's place.
    sudo grub2-mkfont --output=/boot/grub2/DejaVuSansMono.pf2 --size=24 /usr/share/fonts/dejavu/DejaVuSansMono.ttf

  3. Edit /etc/default/grub and add the following lines to the end
    GRUB_VIDEO_BACKEND="vbe"
    GRUB_TERMINAL_OUTPUT="gfxterm"
    GRUB_FONT_PATH="/boot/grub2/DejaVuSansMono.pf2"
    GRUB_GFXMODE="1280x800x24"
    

    replace GRUB_FONT_PATH with the correct filename of the font you generated in the previous step. GRUB_GFXMODE should be the mode you chose from the output of the vbeinfo command.

  4. Backup /boot/grub2/grub.cfg and regenerate it using the new settings.
    sudo cp /boot/grub2/grub.cfg /boot/grub2/grub.cfg.bkp
    sudo grub2-mkconfig -o /boot/grub2/grub.cfg

  5. Reboot and enjoy the graphics.

Firefox font smoothing in Linux

After upgrading to Fedora 16, I noticed that the font rendering looked awful in Firefox. Even an upgrade to Firefox Aurora made no difference. Purely out of desperation, I tried a method I had used previously to fix a similar issue with Chrome, (http://www.lucidelectricdreams.com/2010/09/ugly-font-rendering-in-chrome-linux.html) and hit the jackpot!.

The original post by Zach Beane can be found here and all credit should go to him.

Save the following to ~/.fonts.conf:
<match target="font">
<edit name="autohint" mode="assign">
<bool>true</bool>
</edit>
<edit name="hinting" mode="assign">
<bool>true</bool>
</edit>
<edit mode="assign" name="hintstyle">
<const>hintslight</const>
</edit>
</match>

Installing Caffeine 2.4.1 on Fedora 16

Regular readers probably know that I am a big fan of the Caffeine project (https://launchpad.net/caffeine). I even contributed the Gnome Shell patches to it (http://www.lucidelectricdreams.com/2011/06/disabling-screensaverlock-screen-on.html). After a fresh install of Fedora 16 "Verne", I attempted to install the latest version of Caffeine from the project page - which at the moment is 2.4.1 - and ran into a few problems. So for anyone interested, here's how to install the latest version from source.

  1. Download the tarball from Launchpad and extract it:
    wget http://launchpad.net/caffeine/2.4/2.4.1/+download/caffeine_2.4.1%2B419~oneiric1.tar.gz
    mkdir caffeine 
    tar xvf caffeine_2.4.1%2B419~oneiric1.tar.gz --strip-components 1 -C caffeine
    cd caffeine
    
  2. Run the setup scripts:
    python setup.py build
    sudo python setup.py install
    
  3. Update the icon cache and GSetting schemas:
    sudo gtk-update-icon-cache /usr/share/icons/hicolor/
    sudo glib-compile-schemas /usr/share/glib-2.0/schemas/
    
  4. Correct the permissions:
    sudo chmod 744 /usr/share/caffeine/images/*
    sudo chmod 744 /usr/share/caffeine/glade/*
    
  5. To add Caffeine to startup items, run the following command and click the "Add" button. The path to the executable is /usr/bin/caffeine
    gnome-session-properties
    

Monday, 20 December 2010

Evince failing to open PDF files

I noticed that Evince was suddenly failing to open PDF files with the error message:

File type PDF document (application/pdf) is not supported

Trying to debug the problem, I tried opening a PDF document through the command line and got the following error message.


(evince:1514): EvinceDocument-WARNING **: /usr/lib64/libpoppler-glib.so.5: undefined symbol: cairo_surface_set_mime_data

(evince:1514): EvinceDocument-WARNING **: Cannot load backend 'pdfdocument' since file '/usr/lib64/evince/3/backends/libpdfdocument.so' cannot be read.

(evince:1514): EvinceDocument-WARNING **: /usr/lib64/evince/3/backends/libpdfdocument.so: undefined symbol: cairo_region_union_rectangle

(evince:1514): EvinceDocument-WARNING **: Cannot load backend 'pdfdocument' since file '/usr/lib64/evince/3/backends/libpdfdocument.so' cannot be read.


Now it suddenly makes sense! Fedora 14 has a broken implementation of Cairo graphics library which causes desktop themes to look absolutely ghastly. To get over the problem, I downgraded the Cairo libraries to F13 versions. However, this now seems to have broken Evince. Sure enough; upgrading cairo back to F14 versions made evince work again. Now I am stuck between having a working PDF reader and a nice desktop. It sure is a tough choice!

Thursday, 16 September 2010

Adobe Flash 'Square' for Linux 64bit

After putting 64bit native Linux Flash player on hold indefinitely, Adobe have done an about turn and released a version of Flash Player 10.2 'Square' preview for 64 bit Linux as well. Good things about this release are that:
  • After some serious security flaws were discovered, Adobe advised on an upgrade. But for us poor 64bit Linux users, there was no 64 bit version to upgrade to until now.
  • It's a native Linux 64bit binary which should integrate well with Pulseaudio etc and use less reources. This funny comment on Slashdot illustrates the previous state of things really well.
  • I suddenly seem to be able to watch 1080p HD videos on Youtube. Can't recall ever seeing that option while I was using the old player.
So go ahead and grab the new version from here. To install the plugin in Fedora, just untar and copy libflashplayer.so to /usr/lib64/mozilla/plugins

Saturday, 11 September 2010

Ugly font rendering in Chrome Linux Beta and Unstable

Just upgraded to Google Chrome Beta (6.xx) and then to Unstable (7.xx) in my Fedora box and noticed the  butt-ugly font rendering in both versions. Apparently it's a known issue with gtk-webkit, but I would have expected Google to fix something as elementary and important as font rendering before concentrating on anything else.

A bit of Googling (ofcourse!) dug up this excellent post that fixed the font rendering issue in seconds!

Compare the before and after shots to see how severe the issue is:

Before


After

Thursday, 9 September 2010

Firefox 4 Beta On Fedora

Just stumbled on this blog post while skimming through Google Reader and thought I should share it.

To get the latest Beta installed, follow these steps:


sudo wget -O /etc/yum.repos.d/fedora-firefox4.repo http://repos.fedorapeople.org/repos/spot/firefox4/fedora-firefox4.repo

sudo yum install firefox4


Wednesday, 30 June 2010

DVD Playback on Fedora 13

I never had a real need to watch DVD's on a computer - so DVD playback was not something I needed to get working with Fedora. Recently however, the need arose and to my surprise, the amount of information on the internet about Linux DVD playback is very out-of-date. libdvdcss - the library required to decrypt DVD content is not distributed by any of the usual repositories due to the licensing/legal restrictions (In the US, using libdvdcss may be considered as a DMCA violation. Whoever comes up with these ridiculous laws in the "land of the free" anyway?) The only repository carrying it was livna - which has sadly disappeared off the internet.

Luckily, ATrpm's is still maintaining an up-to-date list of packages and I found the F13 x86_64 version through pbone at http://rpm.pbone.net/index.php3/stat/4/idpl/14089850/dir/fedora_13/com/libdvdcss2-1.2.10-5.fc13.x86_64.rpm.html.

Install is a breeze with:
sudo yum --nogpgcheck localinstall libdvdcss2-1.2.10-5.fc13.x86_64.rpm

Now DVD's work flawlessly with Totem.

Saturday, 20 March 2010

N900 Fun: Using a regular mouse and keyboard with N900

(nDevilTV: http://www.flickr.com/photos/ndevil/)

The Nokia N900 internet tablet is a fantastic gadget for geeks. It runs on the open-source Maemo 5 OS - which is a variant of Debian and for all intents and purposes, can be considered as a mobile computer rather than a phone.

While Maemo 5 is a great operating system by itself, it is not possible to run regular Linux software like Open Office or Gimp directly on it due to UI constraints. (Maemo has its' own GUI optimized for touch input and the small screen size of the tablet). However, a project called easy-debian allows users to install a full version of Debian on N900 and run any applications like a regular computer. It is bundled with the LXDE desktop environment and is very easy to install and use. My only gripe with the system is that it is a bit difficult to move the mouse with the finger - specially when it comes to clicking on stuff. But then again, real geeks use the command line! :)

I regularly use Synergy to share a single mouse and keyboard between my desktop and laptop. Today while messing around with the Easy Debian LXDE, I had the bright idea to see whether Synergy can be used to share the mouse and keyboard with my N900 as well. It turns out I can! The biggest advantage of this is that it allows me to type on my regular keyboard - no more finger cramps while hacking away on the phone. Having the ability to use the mouse in LXDE is pretty cool as well. Finally, don't forget the ability to copy and paste text between the computer and the phone - a very useful thing to have when you are editing config files etc.

For anyone interested, here's what I did:

On my desktop (Fedora 12):
1. sudo yum install synergy
 2. Create a config file. Mine looks as follows. (sayaka is the desktop. saori is the N900.)

section: screens
        sayaka:       
        saori:
end
section: links
        sayaka:                
                right = saori        
        saori:
                left = sayaka
end

3. Start the Synergy server with the config file
synergys -f -c synergy.conf

On my N900:
Start LXDE and open a console
1. Install QuickSynergy
sudo apt-get install quicksynergy

2. Start the Synergy client. Replace sayaka with your own server name
synergyc sayaka

Now if you move the mouse to the right and outside of the monior, it will appear in the N900 desktop. Try clicking on a few icons and typing something using the keyboard. Pretty cool eh?

Thursday, 4 March 2010

Citrix ICA Client on Fedora 12 64bit

Getting Citrix to work on Linux can be tricky - specially since there is no official 64bit client for Linux. However, with a bit of tweaking, it can be made to work. Here's how:

1. Download the Citrix client from the website http://www.citrix.com/English/SS/downloads/details.asp?downloadID=3323&productID=-1 . The current version as of this writing is version 11.100
2. Install the OpenMotif libraries
sudo yum install openmotif openmotif-devel
3. Next we need to install the 32 bit version of libXaw.
sudo yum install libXaw.i686
4. Now install the client. Change directory to the location where the client was downloaded and run:

tar xvf linuxx86-11.100.158406.tar.gz

sudo ./setupwfc

5. Follow the onscreen instructions to install the client. I installed client at /usr/lib/ICAClient and disabled Gnome and KDE integration as well as USB support.
6. Restart the browser if it was already open and navigate to your Citrix site. When the browser prompts to download the .ica file, select open with /usr/lib/ICAClient/wfica and you should be able to see your remote desktop on screen.
7. Alternatively, download the .ica file and run /usr/lib/ICAClient/wfica /path/to/my.ica  (Replace /path/to/my.ica with the real path to your ica file.

Friday, 26 February 2010

Disable the screen saver during Flash movies

I have been annoyed many times by the screen saver kicking in halfway through a Flash video or an SMPlayer session. No amount of fiddling with settings (SMPlayer) helped and disabling the screen saver all together was also not an option.

While browsing through the excellent Linux Journal website, I came across this tech tip about a utility called Caffeine. It's a nifty little utility that runs in the task bar and activates whenever Flash video is being played. It can also be configured to activate whenever a certain process is active - so that solves my SMPlayer problem as well.

As usual, the packaging is only in the deb format. So if you want to run it on Fedora, you need to do a couple of additional steps:

1. Download the tarball from https://launchpad.net/caffeine
2. tar xvf caffeine-1.0.1.tar.gz && cd caffeine-1.0.1
3. sudo yum install python-xlib
4. python setup.py build
5. sudo python setup.py install

You should be now able to start Caffeine by typing caffeine in the command line or by clicking on Applications > Accessories > Caffeine. When Caffeine starts, an icon of a coffee cup will appear in the task bar. Right click the icon to set the properties. My current settings can be seen in the screenshot.

Saturday, 28 November 2009

Hosing the dual boot and recovering from it

I recently installed Fedora 12 in a PC that came pre-installed with Vista. Usually, Windows XP and even Windows 7 is happy to get loaded by Grub - so I went ahead and installed Grub as the default bootloader. Everything went fine until I tried to reboot back to Vista and got the following error message:

BOOTMGR is missing. Press Ctrl+Alt+Del to restart.

I followed many articles in the internet that all advocated using either the Vista startup recovery tools or the command prompt but none worked. So for posterity here's how I fixed the issue:

1. Boot the computer using a Vista CD

2. Select the Language and Keyboard layout from the first screen and click Next.

3. Click on Repair your computer in the next screen.

4. Select your Vista installation from the dialog box and click next.

5. Click on Command Prompt to start a new command prompt

6. Type the following command:
bootrec /FixMbr

7. Type exit to close the command prompt. Then hit the Reboot button.

8. The computer should now boot back to Vista..hurrah! but where's the Fedora installation?

9. Pop the Fedora DVD in to the drive and reboot the computer

10. Select the Rescue option from the Fedora DVD boot menu

11. The installer will prompt you with a few questions (Which unfortunately I can't remember now). They are fairly obvious and simple questions so there should be no issue in getting past them.

12. Finally the installer will mount your Fedora installation into /mnt/sysimage and provide you with a menu to start a shell or reboot. Select the option to start the shell.

13. Run the following command to see a list of partitions:
fdisk -l

14. You have to figure out the device path of your Linux partition. This is usually where /boot is mounted or if you don't have a separate boot partition, where / is mounted. In my case it was /dev/sda5

15. Run grub-install with the correct device path to install Grub in the Linux partition.
grub-install /dev/sda5

16. Now exit the shell and reboot the computer. (Remove the Fedora disk from the drive to prevent booting from the CD)

17. You will boot back to Vista.

18. Download and install EasyBCD (http://neosmart.net/dl.php?id=1)

19. Run EasyBCD and click on Add Remove Entries

20. Click on the Linux tab and select the drive where Grub was installed from the Drive drop-down. You can optionally change the name from "NeoSmart Linux" to "Fedora" if you like.


21. Click Add Entry to save the entry.

22. Restart the computer. You should now be presented with a boot menu. Select the Fedora option (If you named it Fedora in the previous step) and Fedora should boot up!

Sunday, 14 June 2009

Changing the Plymouth Theme in Fedora 11 Leonidas

Plymouth is the new graphical boot system introduced with the release of Fedora 10 Cambridge. It replaced the rhgb (RedHat Graphical Boot) with a snazzier boot screen that supported cool animations. The first version of Plymouth that shipped with Cambridge used a plugin system where each graphical boot animation had to be coded from scratch - something that did not encourage many people to create new boot screens. With the release of Fedora 11, Plymouth has also gone through a major change. It now supports "themes" instead of "plugins" - making it much easier for theme developers to focus on the graphical elements rather than raw coding.

Currently there are 4 Plymouth themes in the Fedora repositories.
  • Charge (Default theme in Leonidas)
  • Spinfinity (A throbber that moves in a path shaped like the infinity sign)
  • Solar (Default theme in Cambridge - the planet with exploding pulsars)
  • Fade-In (Fedora logo fading in and out in a star field)
To check out these themes, you need to download them first.

sudo yum install plymouth-utils "plymouth-theme-*"

After the themes are downloaded, install them as follows:
sudo plymouth-set-default-theme spinfinity
sudo /usr/libexec/plymouth/plymouth-update-initrd


Replace "spinfinity" above with the name of either one of the themes you would like to try out.

EDIT: You can list the installed themes by running the following command
plymouth-set-default-theme --list

Hopefully the new theme system will encourage people to come up with new and exciting themes for Fedora boot-up.

Monday, 9 February 2009

Office 2007 On Linux

I recently managed to get Office 2007 working on Fedora 10 with Wine 1.1.14. I was helped along the way by this article at the excellent wine-reviews blog.

1. Download the latest Wine source tarball from http://www.winehq.org
2. Extract the source. tar xvf wine-1.1.14.tar.bz2
3. Run the installer. This may take a long time. On my Dual Core 1.8GHz laptop with 2GB of RAM, the compilation took about an hour. cd wine-1.1.14
./tools/wineinstall

4. Download winetricks. wget http://www.kegel.com/wine/winetricks
5. Install the MSXML parser, .NET Framework 2, GDI+, RichEdit controls and Visual C++ 2005 Runtime. sh winetricks msxml3 dotnet20 gdiplus riched20 riched30 vcrun2005sp1
6. Run the Office 2007 installer. wine setup.exe

Office 2007 should now be installed in your machine.


Sunday, 25 January 2009

Enable Guest USB Access on VirtualBox

Although I have been using Linux exclusively for a long time now, there are still occasions where some pesky applications demand a Windows environment. For those rare moments, I have Windows XP installed as a guest OS on VirtualBox. VirtualBox is an absolutely wonderful virtualization tool that provides almost every function I need from a Windows box.

Recently however, I had to plug in a USB device to the Guest OS and I found out that the USB device menu is grayed out, preventing me from switching the device over from the host to the guest. I tried messing with the settings but none seemed to have an effect. A quick search of the internet revealed this article which worked like a charm!

First create a new group and add yourself to it
sudo groupadd usb
sudo usermod -G usb `whoami`

Find out the gid of the new group by running the following command
MYGID=`cat /etc/group | grep usb | awk -F ":" '{print $3}'`
Create a new entry in fstab
sudo echo "none /sys/bus/usb/drivers usbfs devgid=$MYGID,devmode=664 0 0" >> /etc/fstab
Restart the computer
sudo reboot

Now when you start VirtualBox, the USB devices can be freely assigned to the guest OS.

Monday, 19 January 2009

Mobile Phone Management With Wammu

I recently needed to backup the contents of my Sony Ericsson K750i. Since the utilities provided with the phone only work on Windows, I had to hunt for a similar application for Linux.

Wammu is a GUI application that can be used to manage a vast number of mobile phones. It uses the Gammu utilities in the back-end and provides a nice GUI front-end to control every aspect of the mobile phone such as the Address book, Calendar, Task list, Call lists, Messages etc. A large number of mobile phones are supported by this tool, a comprehensive list can be found here. Phones can be connected either via USB, IrDA or Bluetooth.


The setup was straightforward.
sudo yum install wammu pybluez

The pybluez package is only required if you want to connect to the phone via bluetooth.

The GUI is quite easy to navigate through. Therefore I am not going to go in to specifics. A screenshot is more than enough to see how intuitive the interface is.

Thursday, 1 January 2009

Fixing Bluetooth and PackageKit problems in Fedora 10

I began to suspect that something was wrong with the D-BUS permissions on my Fedora 10 system when I started getting the following error at the end of a Yum session:
ERROR:dbus.proxies:Introspect error on :1.46:/org/freedesktop/PackageKit: dbus.exceptions.DBusException: org.freedesktop.DBus.Error.AccessDenied: A security policy in place prevents this sender from sending this message to this recipient, see message bus configuration file (rejected message had interface "org.freedesktop.DBus.Introspectable" member "Introspect" error name "(unset)" destination ":1.46")

This seemed to have affected the Bluetooth daemon as well. No matter how I tried, I could not get bluetooth-properties to remember my preferences. My computer was not visible to other Bluetooth enabled devices and I could not browse my phone via Bluetooth. (It used to work flawlessly in Fedora 9). I diagnosed that the problem is with D-Bus by running the following command:
sudo bluetoothd -n -d
bluetoothd always terminated with the error:
Unable to get on D-BUS

I tried mucking around with D-Bus policy settings in /etc/dbus-1/system.d/ but had no luck until I came across this helpful post at FedoraForums.

After editing /etc/dbus-1/system.conf as mentioned, I restarted the computer and voila ! Bluetooth started working and yum stopped complaining !!

For completeness, this is the interesting bit from my new /etc/dbus-1/system.conf
<!-- allow sending valid replies -->
<!-- commented out part
<allow send_requested_reply="true" send_type="method_return"/>
<allow send_requested_reply="true" send_type="error"/>
-->
<!-- Newly added line to fix permission problems -->
<allow send_requested_reply="true" />


Kudos to all the helpful people at Fedora Forums !

Tuesday, 9 December 2008

TrueCrypt 6.1 Install Guide For Fedora 10

Compared to previous versions, installing TrueCrypt 6.1 on Fedora 10 was quite straightforward. Here is a quick list of steps to follow:

1. Download the TrueCrypt 6.1 source tarball from www.truecrypt.org
2. Untar the source
tar xvf TrueCrypt\ 6.1a\ Source.tar.gz
3. Install required libraries
sudo yum install nss-pkcs11-devel fuse-devel wxGTK wxGTK-devel
EDIT: You might also need the following packages if you haven't installed them already. (Thanks Vin).
sudo yum install gnome-keyring-devel gcc-c++
4. Export the Cryptoki include folder
export PKCS11_INC=/usr/include/gp11
5. Run make
make
You may get the following error messages:
../Common/SecurityToken.cpp:654: error: ‘CKR_NEW_PIN_MODE’ was not declared in this scope
../Common/SecurityToken.cpp:655: error: ‘CKR_NEXT_OTP’ was not declared in this scope

5.1 Open Common/SecurityToken.cpp in your favourite editor.
5.2 Scroll to line 654
5.3 Comment out line 654 and 655. It should look like this:
// TC_CASE_STR (CKR_NEW_PIN_MODE);
// TC_CASE_STR (CKR_NEXT_OTP);
5.4 Save and exit
5.5 Run make again
[Some people may not like to fiddle with code like this. But these two lines are only used to generate error messages. At the very worst, you will end up getting a generic error message instead of a more focussed one. ]
6. TrueCrypt is now compiled. You can find the executable inside the folder titled 'Main'. You might want to make it available from your bin directory for easy access.
sudo cp Main/truecrypt /usr/share/bin

All done!

Sunday, 2 November 2008

Romanized Sinhala On Linux

This post may not be of interest to non Sri Lankans, but considering that a large number of Fedora users are from Sri Lanka (http://fedoraproject.org/maps/f9/), I decided to post this here.

I was introduced to the new Sinhala smart font by my friend McoreD, and all credits should go to him for discovering this gem. Currently, all available Sinhala fonts are not romanized. Therefore, typing them and displaying them is a real headache. The new smart font Suriyakumara is the first of it's kind, introducing a romanized sinhala font that is very easy to write and display. If the reader does not have the font installed, the displayed text will be in English, but still readable because the characters are directly translated in to their English equivalents. So no more weird looking gobbledygook we have come to experience with the traditional Sinhala fonts. Anyway, take a look at http://www.lovatasinhala.com/ and you will see what I am talking about. The animated header expresses this concept very nicely.

Getting the font to work on Windows involves installing a new keyboard layout. But in Linux, it was a breeze to setup. I was actually amazed by the ease with which I managed to get it working. This is definitely one of those things where the Linux way is much easier than the Windows way.

1. To begin, download the Suriyakumara font.
wget http://www.americansmartfonts.com/download/Suriyakumara.ttf

2. Make a new folder for the font in /usr/share/fonts and copy it over.
sudo mkdir /usr/share/fonts/sinhala
sudo cp Suriyakumara.ttf /usr/share/fonts/sinhala
cd /usr/share/fonts/sinhala


3. Run the font scaler and refresh the font cache
sudo mkfontscale && sudo mkfontdir
sudo fc-cache


4. The font is now installed. If Firefox was running while you were doing the above, close it and open it again. Then browse to http://www.lovatasinhala.com/. You should see the left column in Sinhala now.

5. Typing in Sinhala is easy. For example, open up Thunderbird, create a new message and type "penguyin" without the quotes. Select what you typed and change the font to Suriyakumara. You should see "Penguin" written in Sinhala.

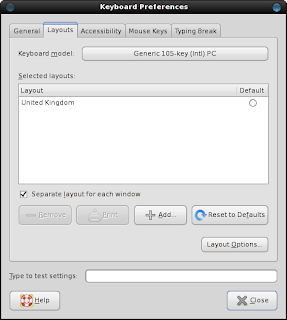
6. Some characters such as "th" require latin characters. To be able to type those, go to System > Preferences > Hardware > Keyboard.

7. Click the Layouts tab and click the Add button.


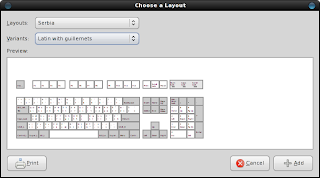
8. Select "Serbia" from the Layout menu and select "Latin with guillements" from the Variants menu. Click Add.


9. By clicking Layout options, you can change the way you want to switch between the different keyboard layouts. I set it to switch when I press both ALT keys together.

10. Give it a spin. For example, to type "thaththa" do the following : "Alt+P aa Alt+P Alt+P aa". The full guide is here.


There is an active dev group over at http://groups.google.com.au/group/SinhalaUserGroup. Take part and help this wonderful project.