I was intending to stick to Fedora 8 until Sulphur final version was officially released, but a freak partition table corruption resulted in me having to reformat the whole hard drive. So then I decided to go with Fedora 9 Preview release and needless to say, I am pretty impressed with what I have seen. I have installed every Fedora release since Fedora Core 4, and Fedora 9 is the most seamless and hassle free setup I have experienced so far. Most of the things work out of the box without the need for any configuration. But here are a few of the settings and related pitfalls from my experience.
Repositories
The default yum repository is Fedora-rawhide and most of the tools required for general use can be found in it. But for those of us who need to install additional and non 'free' stuff, the best option is to enable the livna repositories. The caveat here is that there's no official livna repo for Fedora 9 yet, so we have to make do with the livna-development repo for now.
wget http://rpm.livna.org/livna-release-8.rpm
rpm -ivh livna-release-8.rpm
Once the repo is installed, open /etc/yum.repos.d/livna.repo and set enabled=1 to enabled=0. Then open /etc/yum.repos.d/livna-development.repo and set enabled=0 to enabled=1. That's it, livna is up and running now !.
ATI Display Driver
Unfortunately, the ATI proprietary drivers have a problem with the new kernel in Fedora 9 and won't install at all. kmod-fglrx from the livna repo also didn't work on my machine. Apparently it's still a work in progress. So for now, I have to live with the default radeon drivers installed by Fedora setup. It's not too bad however, and so far I didn't really miss the ATI drivers except when I tried to enable compiz. But I suppose I can survive without compiz for a couple of weeks.
Metacity Compositing Manager
Gnome 2.22 has simple composite effects built in. So if compiz is too resource intensive, give the new Gnome effects a try. The effects are very low key, such as previews in Alt+tab window switching and minimize animations. To enable the effects, run the following command:
gconftool-2 -s --type bool /apps/metacity/general/compositing_manager true Substitute false for true if you want to disable the effects.
Media Playback
Fedora doesn't come with any of the proprietary codecs for media playback. To enable mp3 and other codecs, do the following. (Make sure livna repo is enabled)
sudo yum install xine-lib-extras-nonfree gstreamer*
Most of the audio and video formats should be playable now. I recommend vlc for video playback and audacious for audio.
sudo yum install vlc audacious audacious-plugins*
Flash Audio in Firefox 3b5
If there is no sound while playing flash videos in Firefox (Youtube, GoogleVideo etc.) you need to install libflashsupport. I couldn't find it in the rawhide or livna repositories, but I found it in the install DVD. So first, setup the install DVD as a repository. The default mount point of the DVD has spaces, which seems to confuse yum. Therefore, I mounted the DVD manually.
sudo umount /media/Fedora\ 9-Preview\ i386\ DVD/
sudo mkdir /mnt/cd
sudo mount -t iso9660 /dev/cdrom /mnt/cd
Then copy media.repo to yum.repos.d
sudo cp /mnt/cd/media.repo /etc/yum.repos.d/media.repo
Edit media.repo and add the following line
baseurl=file:///mnt/cd/
The full contents of the file will be as follows:
[InstallMedia]
name=Fedora 9-Preview
mediaid=1208448886.504557
metadata_expire=-1
gpgcheck=0
baseurl=file:///mnt/cd/
cost=500
Now that we have the repo enabled. Install libflashsupport
sudo yum install libflashsupport
If Firefox is running, exit and restart Firefox again. Go to Youtube and play a video. You should hear the sounds now.
To be continued...
Wednesday, 23 April 2008

Monday, 21 April 2008
Sony Vaio VGN-CR11 Hotkeys
This post is strictly not Linux related, but since many users around the internet seem to have problems getting the hotkeys to work after an 'upgrade' to XP from Vista, I thought I should document the process here.
<rant>
First of all, the hotkeys I am referring to are the combinations of Fn + F5,F6,F7,F10. They are used to adjust screen brightness, switch between dual video outputs and magnify the screen. There are other buttons on the laptop such as the media control buttons and the AV mode buttons. Unfortunately, these don't work with XP like they do in Vista, and I haven't been able to find a fix. Winamp does detect the Play/Pause,Stop,Previous Track and Next Track buttons, but the volume controls and the mute button still won't work.
The most annoying thing however is the Fn hotkey settings. I can't imagine the logic of controlling the monitor brightness with software. This effectively means that any users not using the Sony recommended Vista crap will get an ultra bright monitor that will eventually make their eyes explode. Unfortunately, I don't have the time or money to look in to this; but I am sure it's illegal in some way.
</rant>
To get the Fn key combinations working in XP, first you need to download the Sony Shared Library and the Sony Utilities DLL from the Sony-Asia site (http://www.sony-asia.com/support/download/226061/product/vgn-cr11gh/sectionfirst?site=hp_en_AP_i&subpage=detail). They seem to be the only sane Sony division with proper Vista-to-XP 'upgrade' options at the moment.
You also need to download the Hotkey Utility from Vaio-link (ftp://ftp.vaio-link.com/pub/VAIO/HOTKEY/ ). I grabbed the "SONYUTILS_HOTKEY_10_ENG.zip", you might want to grab a different language edition if your native language is not English.
Then, install the 3 packages in this order:
<rant>
This is a ridiculous instance of vendor arrogance. We pay for the hardware but they force down their choice of software on us too. How hard can it be to port their tiny Vista driver to work on XP ? Are they so short-handed or more likely, are they employing drunken monkeys as programmers ?? How legal is it to cripple a perfectly working hardware just because the customer chose an alternative OS ??
</rant>
Finally, if you're tired of all this crap, give linux a try. All the special buttons work on Fedora 8 and 9 as expected without any configuration at all. However, the Fn key combinations are not working. But the brighness control widget for Gnome panel more than compensates for that tiny shortcoming.
<rant>
First of all, the hotkeys I am referring to are the combinations of Fn + F5,F6,F7,F10. They are used to adjust screen brightness, switch between dual video outputs and magnify the screen. There are other buttons on the laptop such as the media control buttons and the AV mode buttons. Unfortunately, these don't work with XP like they do in Vista, and I haven't been able to find a fix. Winamp does detect the Play/Pause,Stop,Previous Track and Next Track buttons, but the volume controls and the mute button still won't work.
The most annoying thing however is the Fn hotkey settings. I can't imagine the logic of controlling the monitor brightness with software. This effectively means that any users not using the Sony recommended Vista crap will get an ultra bright monitor that will eventually make their eyes explode. Unfortunately, I don't have the time or money to look in to this; but I am sure it's illegal in some way.
</rant>
To get the Fn key combinations working in XP, first you need to download the Sony Shared Library and the Sony Utilities DLL from the Sony-Asia site (http://www.sony-asia.com/support/download/226061/product/vgn-cr11gh/sectionfirst?site=hp_en_AP_i&subpage=detail). They seem to be the only sane Sony division with proper Vista-to-XP 'upgrade' options at the moment.
You also need to download the Hotkey Utility from Vaio-link (ftp://ftp.vaio-link.com/pub/VAIO/HOTKEY/ ). I grabbed the "SONYUTILS_HOTKEY_10_ENG.zip", you might want to grab a different language edition if your native language is not English.
Then, install the 3 packages in this order:
- Sony Shared Library [Reboot after intallation]
- Sony Utilities DLL
- Hotkey Utility [Reboot after installation]
<rant>
This is a ridiculous instance of vendor arrogance. We pay for the hardware but they force down their choice of software on us too. How hard can it be to port their tiny Vista driver to work on XP ? Are they so short-handed or more likely, are they employing drunken monkeys as programmers ?? How legal is it to cripple a perfectly working hardware just because the customer chose an alternative OS ??
</rant>
Finally, if you're tired of all this crap, give linux a try. All the special buttons work on Fedora 8 and 9 as expected without any configuration at all. However, the Fn key combinations are not working. But the brighness control widget for Gnome panel more than compensates for that tiny shortcoming.
Friday, 18 April 2008
Conky : System monitoring eye candy
[This is not really news, but I thought I would keep a record just in case for future reference.]
Recently I came across this nifty utility called conky, which displays information about the system on the desktop. It's light-weight and highly customizable. Everything is controlled via the .conkyrc file in the home directory, and the settings are quite intuitive.
Installing conky is a breeze. Just grab the source from http://conky.sourceforge.net/ and do the make dance.
tar -jxvf conky-1.5.1.tar.bz2
cd conky-1.5.1
./configure
make
sudo make install
To run conky with the default settings, just type
conky
My Fedora 8 system by default didn't have X double buffering enabled. If you start to see some flicker or if the text gets garbled, open up xorg.conf and add the following line to the Modules section.
Load "dbe" Restart X afterwards to enable the setting.
http://conky.sourceforge.net/screenshots.html lists several conky configurations with screenshots. Just download what you fancy and save it in the home directory as .conkyrc and restart conky to see the results. You can customize the setup by editing conkyrc, it's quite intuitive. If you have done any HTML+CSS coding before, you'll be right at home with the conky syntax.
http://conky.sourceforge.net/variables.html Lists available conky variables and http://conky.sourceforge.net/config_settings.html lists the config settings. You can also try the man pages for reference.
I am posting my conkyrc below for backup purposes.
# Conky sample configuration
#
# the list of variables has been removed from this file in favour
# of keeping the documentation more maintainable.
# Check http://conky.sf.net for an up-to-date-list.
# set to yes if you want Conky to be forked in the background
background no
# X font when Xft is disabled, you can pick one with program xfontsel
#font 5x7
#font 6x10
#font 7x13
#font 8x13
#font 9x15
#font *mintsmild.se*
#font -*-*-*-*-*-*-34-*-*-*-*-*-*-*
font 9x15
# Use Xft?
use_xft yes
# Xft font when Xft is enabled
xftfont Bitstream Vera Sans Mono:size=8
# Text alpha when using Xft
xftalpha 0.8
# Print everything to stdout?
# out_to_console no
# MPD host/port
# mpd_host localhost
# mpd_port 6600
# mpd_password tinker_bell
# Print everything to console?
# out_to_console no
# mail spool
mail_spool $MAIL
# Update interval in seconds
update_interval 5.0
# This is the number of times Conky will update before quitting.
# Set to zero to run forever.
total_run_times 0
# Create own window instead of using desktop (required in nautilus)
own_window yes
# If own_window is yes, you may use type normal, desktop or override
own_window_type override
# Use pseudo transparency with own_window?
own_window_transparent yes
# If own_window_transparent is set to no, you can set the background colour here
own_window_colour white
# If own_window is yes, these window manager hints may be used
#own_window_hints undecorated,below,sticky,skip_taskbar,skip_pager
own_window_hints undecorated,below,sticky
# Use double buffering (reduces flicker, may not work for everyone)
double_buffer yes
# Minimum size of text area
minimum_size 280 5
# Draw shades?
draw_shades no
# Draw outlines?
draw_outline no
# Draw borders around text
draw_borders no
# Draw borders around graphs
draw_graph_borders yes
# Stippled borders?
stippled_borders 8
# border margins
border_margin 4
# border width
border_width 1
# Default colors and also border colors
default_color white
default_shade_color black
default_outline_color green
# Text alignment, other possible values are commented
#alignment top_left
alignment top_right
#alignment bottom_left
#alignment bottom_right
#alignment none
# Gap between borders of screen and text
# same thing as passing -x at command line
gap_x 12
gap_y 35
# Subtract file system buffers from used memory?
no_buffers yes
# set to yes if you want all text to be in uppercase
uppercase no
# number of cpu samples to average
# set to 1 to disable averaging
cpu_avg_samples 2
# number of net samples to average
# set to 1 to disable averaging
net_avg_samples 2
# Force UTF8? note that UTF8 support required XFT
override_utf8_locale no
# Add spaces to keep things from moving about? This only affects certain objects.
use_spacer left
# Allow each port monitor to track at most this many connections (if 0 or not set, default is 256)
#max_port_monitor_connections 256
# Maximum number of special things, e.g. fonts, offsets, aligns, etc.
#max_specials 512
# Maximum size of buffer for user text, i.e. below TEXT line.
#max_user_text 16384
# variable is given either in format $variable or in ${variable}. Latter
# allows characters right after the variable and must be used in network
# stuff because of an argument
# stuff after 'TEXT' will be formatted on screen
TEXT
$color $nodename - $sysname $kernel on $machine
$hr
Uptime:${color #606060} $uptime $color - Load:${color #606060} $loadavg
$color CPU Usage:${color #606060} $cpu% ${cpubar}
${color #606060} ${cpugraph 0000ff 00ec00}
$color RAM Usage:${color #606060} $mem/$memmax - $memperc% ${membar}
$color Swap Usage:${color #606060} $swap/$swapmax - $swapperc% ${swapbar}
$color Processes:${color #606060} $processes $color Running:${color #606060} $running_processes
$color$hr
Networking:
Down:${color #606060} ${downspeed wlan0} k/s$color ${offset 80}Up:${color #606060} ${upspeed wlan0} k/s
${color #606060}${downspeedgraph wlan0 32,150 ff0000 0000ec} ${upspeedgraph wlan0 32,150 0000ff ec0000}
$color File systems: / ${color #606060}${fs_used /}/${fs_size /} ${fs_bar /}
$color Name PID CPU% MEM%
${color #ec0000} ${top name 1} ${top pid 1} ${top cpu 1} ${top mem 1}
${color #606060} ${top name 2} ${top pid 2} ${top cpu 2} ${top mem 2}
${top name 3} ${top pid 3} ${top cpu 3} ${top mem 3}
${top name 4} ${top pid 4} ${top cpu 4} ${top mem 4}
$color Mem usage
${color #ec0000} ${top_mem name 1} ${top_mem pid 1} ${top_mem cpu 1} ${top_mem mem 1}
${color #606060} ${top_mem name 2} ${top_mem pid 2} ${top_mem cpu 2} ${top_mem mem 2}
${top_mem name 3} ${top_mem pid 3} ${top_mem cpu 3} ${top_mem mem 3}
$color$hr
Connections in:${color #606060} ${tcp_portmon 1 32767 count}$color Connections out:${color #606060} ${tcp_portmon 32768 61000 count}$color Total:${color #606060} ${tcp_portmon 1 65535 count}
$color Inbound Connection ${alignr} Local Service/Port
${color #606060} ${tcp_portmon 1 32767 rhost 0} ${alignr} ${tcp_portmon 1 32767 lservice 0}
${tcp_portmon 1 32767 rhost 1} ${alignr} ${tcp_portmon 1 32767 lservice 1}
${tcp_portmon 1 32767 rhost 2} ${alignr} ${tcp_portmon 1 32767 lservice 2}
${tcp_portmon 1 32767 rhost 3} ${alignr} ${tcp_portmon 1 32767 lservice 3}
${tcp_portmon 1 32767 rhost 4} ${alignr} ${tcp_portmon 1 32767 lservice 4}
${tcp_portmon 1 32767 rhost 5} ${alignr} ${tcp_portmon 1 32767 lservice 5}
$color Outbound Connection ${alignr} Remote Service/Port$color
${color #606060} ${tcp_portmon 32768 61000 rhost 0} ${alignr} ${tcp_portmon 32768 61000 rservice 0}
${tcp_portmon 32768 61000 rhost 1} ${alignr} ${tcp_portmon 32768 61000 rservice 1}
${tcp_portmon 32768 61000 rhost 2} ${alignr} ${tcp_portmon 32768 61000 rservice 2}
${tcp_portmon 32768 61000 rhost 3} ${alignr} ${tcp_portmon 32768 61000 rservice 3}
${tcp_portmon 32768 61000 rhost 4} ${alignr} ${tcp_portmon 32768 61000 rservice 4}
${tcp_portmon 32768 61000 rhost 5} ${alignr} ${tcp_portmon 32768 61000 rservice 5}
$color$hr

Recently I came across this nifty utility called conky, which displays information about the system on the desktop. It's light-weight and highly customizable. Everything is controlled via the .conkyrc file in the home directory, and the settings are quite intuitive.
Installing conky is a breeze. Just grab the source from http://conky.sourceforge.net/ and do the make dance.
tar -jxvf conky-1.5.1.tar.bz2
cd conky-1.5.1
./configure
make
sudo make install
To run conky with the default settings, just type
conky
My Fedora 8 system by default didn't have X double buffering enabled. If you start to see some flicker or if the text gets garbled, open up xorg.conf and add the following line to the Modules section.
Load "dbe" Restart X afterwards to enable the setting.
http://conky.sourceforge.net/screenshots.html lists several conky configurations with screenshots. Just download what you fancy and save it in the home directory as .conkyrc and restart conky to see the results. You can customize the setup by editing conkyrc, it's quite intuitive. If you have done any HTML+CSS coding before, you'll be right at home with the conky syntax.
http://conky.sourceforge.net/variables.html Lists available conky variables and http://conky.sourceforge.net/config_settings.html lists the config settings. You can also try the man pages for reference.
I am posting my conkyrc below for backup purposes.
# Conky sample configuration
#
# the list of variables has been removed from this file in favour
# of keeping the documentation more maintainable.
# Check http://conky.sf.net for an up-to-date-list.
# set to yes if you want Conky to be forked in the background
background no
# X font when Xft is disabled, you can pick one with program xfontsel
#font 5x7
#font 6x10
#font 7x13
#font 8x13
#font 9x15
#font *mintsmild.se*
#font -*-*-*-*-*-*-34-*-*-*-*-*-*-*
font 9x15
# Use Xft?
use_xft yes
# Xft font when Xft is enabled
xftfont Bitstream Vera Sans Mono:size=8
# Text alpha when using Xft
xftalpha 0.8
# Print everything to stdout?
# out_to_console no
# MPD host/port
# mpd_host localhost
# mpd_port 6600
# mpd_password tinker_bell
# Print everything to console?
# out_to_console no
# mail spool
mail_spool $MAIL
# Update interval in seconds
update_interval 5.0
# This is the number of times Conky will update before quitting.
# Set to zero to run forever.
total_run_times 0
# Create own window instead of using desktop (required in nautilus)
own_window yes
# If own_window is yes, you may use type normal, desktop or override
own_window_type override
# Use pseudo transparency with own_window?
own_window_transparent yes
# If own_window_transparent is set to no, you can set the background colour here
own_window_colour white
# If own_window is yes, these window manager hints may be used
#own_window_hints undecorated,below,sticky,skip_taskbar,skip_pager
own_window_hints undecorated,below,sticky
# Use double buffering (reduces flicker, may not work for everyone)
double_buffer yes
# Minimum size of text area
minimum_size 280 5
# Draw shades?
draw_shades no
# Draw outlines?
draw_outline no
# Draw borders around text
draw_borders no
# Draw borders around graphs
draw_graph_borders yes
# Stippled borders?
stippled_borders 8
# border margins
border_margin 4
# border width
border_width 1
# Default colors and also border colors
default_color white
default_shade_color black
default_outline_color green
# Text alignment, other possible values are commented
#alignment top_left
alignment top_right
#alignment bottom_left
#alignment bottom_right
#alignment none
# Gap between borders of screen and text
# same thing as passing -x at command line
gap_x 12
gap_y 35
# Subtract file system buffers from used memory?
no_buffers yes
# set to yes if you want all text to be in uppercase
uppercase no
# number of cpu samples to average
# set to 1 to disable averaging
cpu_avg_samples 2
# number of net samples to average
# set to 1 to disable averaging
net_avg_samples 2
# Force UTF8? note that UTF8 support required XFT
override_utf8_locale no
# Add spaces to keep things from moving about? This only affects certain objects.
use_spacer left
# Allow each port monitor to track at most this many connections (if 0 or not set, default is 256)
#max_port_monitor_connections 256
# Maximum number of special things, e.g. fonts, offsets, aligns, etc.
#max_specials 512
# Maximum size of buffer for user text, i.e. below TEXT line.
#max_user_text 16384
# variable is given either in format $variable or in ${variable}. Latter
# allows characters right after the variable and must be used in network
# stuff because of an argument
# stuff after 'TEXT' will be formatted on screen
TEXT
$color $nodename - $sysname $kernel on $machine
$hr
Uptime:${color #606060} $uptime $color - Load:${color #606060} $loadavg
$color CPU Usage:${color #606060} $cpu% ${cpubar}
${color #606060} ${cpugraph 0000ff 00ec00}
$color RAM Usage:${color #606060} $mem/$memmax - $memperc% ${membar}
$color Swap Usage:${color #606060} $swap/$swapmax - $swapperc% ${swapbar}
$color Processes:${color #606060} $processes $color Running:${color #606060} $running_processes
$color$hr
Networking:
Down:${color #606060} ${downspeed wlan0} k/s$color ${offset 80}Up:${color #606060} ${upspeed wlan0} k/s
${color #606060}${downspeedgraph wlan0 32,150 ff0000 0000ec} ${upspeedgraph wlan0 32,150 0000ff ec0000}
$color File systems: / ${color #606060}${fs_used /}/${fs_size /} ${fs_bar /}
$color Name PID CPU% MEM%
${color #ec0000} ${top name 1} ${top pid 1} ${top cpu 1} ${top mem 1}
${color #606060} ${top name 2} ${top pid 2} ${top cpu 2} ${top mem 2}
${top name 3} ${top pid 3} ${top cpu 3} ${top mem 3}
${top name 4} ${top pid 4} ${top cpu 4} ${top mem 4}
$color Mem usage
${color #ec0000} ${top_mem name 1} ${top_mem pid 1} ${top_mem cpu 1} ${top_mem mem 1}
${color #606060} ${top_mem name 2} ${top_mem pid 2} ${top_mem cpu 2} ${top_mem mem 2}
${top_mem name 3} ${top_mem pid 3} ${top_mem cpu 3} ${top_mem mem 3}
$color$hr
Connections in:${color #606060} ${tcp_portmon 1 32767 count}$color Connections out:${color #606060} ${tcp_portmon 32768 61000 count}$color Total:${color #606060} ${tcp_portmon 1 65535 count}
$color Inbound Connection ${alignr} Local Service/Port
${color #606060} ${tcp_portmon 1 32767 rhost 0} ${alignr} ${tcp_portmon 1 32767 lservice 0}
${tcp_portmon 1 32767 rhost 1} ${alignr} ${tcp_portmon 1 32767 lservice 1}
${tcp_portmon 1 32767 rhost 2} ${alignr} ${tcp_portmon 1 32767 lservice 2}
${tcp_portmon 1 32767 rhost 3} ${alignr} ${tcp_portmon 1 32767 lservice 3}
${tcp_portmon 1 32767 rhost 4} ${alignr} ${tcp_portmon 1 32767 lservice 4}
${tcp_portmon 1 32767 rhost 5} ${alignr} ${tcp_portmon 1 32767 lservice 5}
$color Outbound Connection ${alignr} Remote Service/Port$color
${color #606060} ${tcp_portmon 32768 61000 rhost 0} ${alignr} ${tcp_portmon 32768 61000 rservice 0}
${tcp_portmon 32768 61000 rhost 1} ${alignr} ${tcp_portmon 32768 61000 rservice 1}
${tcp_portmon 32768 61000 rhost 2} ${alignr} ${tcp_portmon 32768 61000 rservice 2}
${tcp_portmon 32768 61000 rhost 3} ${alignr} ${tcp_portmon 32768 61000 rservice 3}
${tcp_portmon 32768 61000 rhost 4} ${alignr} ${tcp_portmon 32768 61000 rservice 4}
${tcp_portmon 32768 61000 rhost 5} ${alignr} ${tcp_portmon 32768 61000 rservice 5}
$color$hr

Wednesday, 16 April 2008
screen : Manage multiple sessions over a SSH connection
Screen is a popular utility that every system admin must know about. It's essentially a window manager for your shell sessions so that you can work on multiple shells at once without opening multiple connections to the server, Screen is specially useful if your connection is unreliable and has a tendency to drop while in the middle of something. Screen keeps running in the background even if you get disconnected, so you can imagine what a life saver it is.
I summarize some of the most important commands here for my future convenience. But the best way to get information about screen is to read the man pages.
After opening a connection to the server, simply run 'screen' to start screen. It might appear that nothing happened, but be assured, you're now in one of the screen 'windows'. To check, simply run:
screen -ls
The output will be similar to the following:
There is a screen on:
23876.pts-1.TuxMaster-JanuZ (Attached)
1 Socket in /var/run/screen/S-januz.
Once screen is running, there are several keyboard shortcuts that can be used. Some of the most important ones are:
C-a-c : Open another 'window'
C-a-n : Switch to next 'window'
C-a-p : Switch to previous 'window'
C-a-d : Detach the 'window'. The commands running in the window keeps running in the background even if you get disconnected.
C-a-h : Create a log of the session
C-a-? : Display a help window with all the keyboard shortcuts
If you got disconnected from a session and want to resume from where you left off, simply log back in and run the following set of commands to re-attach to the windows:
First list the running screen sessions
screen -ls
The output will be similar to
There is a screen on:
23876.pts-1.TuxMaster-JanuZ (Detached)
1 Socket in /var/run/screen/S-januz.
To re-attach, run screen with -r option, giving the session name (23876.pts-1.TuxMaster-JanuZ).
screen -r 23876.pts-1.TuxMaster-JanuZ
Sometimes, simply typing
screen -r 23876
also works.
Check out the man pages for more information or Google around for a tutorial. Mastering screen will be one of the best moves you will ever make.
I summarize some of the most important commands here for my future convenience. But the best way to get information about screen is to read the man pages.
After opening a connection to the server, simply run 'screen' to start screen. It might appear that nothing happened, but be assured, you're now in one of the screen 'windows'. To check, simply run:
screen -ls
The output will be similar to the following:
There is a screen on:
23876.pts-1.TuxMaster-JanuZ (Attached)
1 Socket in /var/run/screen/S-januz.
Once screen is running, there are several keyboard shortcuts that can be used. Some of the most important ones are:
C-a-c : Open another 'window'
C-a-n : Switch to next 'window'
C-a-p : Switch to previous 'window'
C-a-d : Detach the 'window'. The commands running in the window keeps running in the background even if you get disconnected.
C-a-h : Create a log of the session
C-a-? : Display a help window with all the keyboard shortcuts
If you got disconnected from a session and want to resume from where you left off, simply log back in and run the following set of commands to re-attach to the windows:
First list the running screen sessions
screen -ls
The output will be similar to
There is a screen on:
23876.pts-1.TuxMaster-JanuZ (Detached)
1 Socket in /var/run/screen/S-januz.
To re-attach, run screen with -r option, giving the session name (23876.pts-1.TuxMaster-JanuZ).
screen -r 23876.pts-1.TuxMaster-JanuZ
Sometimes, simply typing
screen -r 23876
also works.
Check out the man pages for more information or Google around for a tutorial. Mastering screen will be one of the best moves you will ever make.
Compiz-fusion 0.7.5
If you installed compiz-fusion on Fedora 8 in a similar way to mine, you might have noticed that the package updater is encountering some errors while trying to update compiz packages. Here's what I did to update compiz-fusion to version 0.7.5 using the repository found at http://www.dfm.uninsubria.it/compiz/fusion/compiz-fusion.repo
Step 1 : Find all your active repositories
sudo yum repolist
Step 2 : Disable all repos except the fusion repo and update !
sudo yum --disablerepo=fedora --disablerepo=livna --disablerepo=updates update compiz-all fusion-all
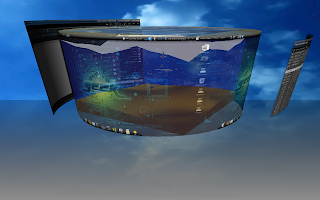
I haven't had the time to explore at depth, but the most striking new addition is the cylinder effect. It certainly beats the boring cube. I also noticed that cube atlantis has got coloured fish now (Hard to see in the screenshot).
As always, compiz-fusion rocks !
Step 1 : Find all your active repositories
sudo yum repolist
Step 2 : Disable all repos except the fusion repo and update !
sudo yum --disablerepo=fedora --disablerepo=livna --disablerepo=updates update compiz-all fusion-all
I haven't had the time to explore at depth, but the most striking new addition is the cylinder effect. It certainly beats the boring cube. I also noticed that cube atlantis has got coloured fish now (Hard to see in the screenshot).
As always, compiz-fusion rocks !

Wednesday, 9 April 2008
Fedora 9 Sulphur Beta Live CD - A first look
Fedora 9 codenamed Sulphur will release in 20 more days. Keeping to the Fedora Project's tradition of being on the bleeding edge of technology, the new release is chock-full of the latest and greatest software releases. Some of the touted new features include:
Unable to contain my excitement, I decided to download the live CD (http://fedoraproject.org/en/get-prerelease) and give it a spin (pun intended). Due to the proprietary nature of my laptop, all the live CD's I have tried so far ( Ubuntu Gutsy, Ubuntu Hardy Alpha, Backtrack3, Fedora Werewolf, Linux Gamers Live) never worked as intended. The only exception is Sabayon, which comes with ATI drivers pre-loaded. I realize that it's not possible to bundle proprietary drivers with the distros, but what I never understood was why they didn't default back to VGA settings and at least run a puny desktop.
Anyway, getting back to the topic, Sulphur live CD was a pleasant surprise as it correctly identified my display driver without any intervention. So for the first time since Sabayon, I was able to directly log on to a GUI without having to meddle with xorg.conf and ATI drivers. The artwork has not changed since Fedora 8. The boot screens and the logon screens all have the same design as Fedora 8. If the past is any indication, I would expect the final release to have newer and snazzier artwork. But for the time being, Sulphur is almost identical to it's older sibling.
Eversince FC6, Wireless connections in Fedora has been a pet peeve of mine. Until few months ago, to connect to my wirless network, I always had to run my own script. NetworkManager never ever seemed to work for me. It was the same for Fedora 8, until a couple of months ago; when I finally managed to tame NetworkManager. Fedora 9 Beta exceeded my expectations when it connected to my wireless network without a hitch ! If the live CD was a girl, I swear I would have married it right then !! :)
The new version of Gnome is working as expected. There are no obvious differences when compared to Gnome 2.20, but I really love the new world clock. Nautilus seems more responsive than usual, even though I am running off a CD. I didn't try to enable the built-in compositing manager, because the default display driver doesn't support direct rendering and frame buffers. All in all, my first impression of Gnome 2.22 is a very good one.
Firefox has never looked this nice ! It's truly a great step forward to have full system integration. Earlier, Firefox was the odd man out as it never followed the system settings. I had to tweak Firefox for hours before it looked decent in Fedora 8, but even then the pages never looked right and fonts always got screwed up. In Fedora 9, Firefox is fully integrated with the system and everything looks great ! Kudos to everyone involved in getting Fedora and Firefox together.
Testing ext4 and NTFS resizing will have to wait until I finally install Fedora 9. But so far from what I have seen, Fedora 9 is going to be one of the best releases in the history of the Fedora project. This is not to say that all previous releases of Fedora were crap. But unlike the users of other distros such as Ubuntu, Fedora users always had to pay a price for being on the bleeding edge. Things always didn't work together and required a lot of tweaking. This is probably what keeps many novice users away from Fedora. However now, Fedora is at least stable enough to go mainstream. Hopefully it will open the eyes of all those Ubuntu fanatics who think that Ubuntu is the only Linux distro in the world.


- KDE 4.0.2
- Gnome 2.22
- Firefox 3b5 with integrated look & feel
- Packagekit for cross-platform package management
- Improved NetworkManager
- ext4 file system
Unable to contain my excitement, I decided to download the live CD (http://fedoraproject.org/en/get-prerelease) and give it a spin (pun intended). Due to the proprietary nature of my laptop, all the live CD's I have tried so far ( Ubuntu Gutsy, Ubuntu Hardy Alpha, Backtrack3, Fedora Werewolf, Linux Gamers Live) never worked as intended. The only exception is Sabayon, which comes with ATI drivers pre-loaded. I realize that it's not possible to bundle proprietary drivers with the distros, but what I never understood was why they didn't default back to VGA settings and at least run a puny desktop.
Anyway, getting back to the topic, Sulphur live CD was a pleasant surprise as it correctly identified my display driver without any intervention. So for the first time since Sabayon, I was able to directly log on to a GUI without having to meddle with xorg.conf and ATI drivers. The artwork has not changed since Fedora 8. The boot screens and the logon screens all have the same design as Fedora 8. If the past is any indication, I would expect the final release to have newer and snazzier artwork. But for the time being, Sulphur is almost identical to it's older sibling.
Eversince FC6, Wireless connections in Fedora has been a pet peeve of mine. Until few months ago, to connect to my wirless network, I always had to run my own script. NetworkManager never ever seemed to work for me. It was the same for Fedora 8, until a couple of months ago; when I finally managed to tame NetworkManager. Fedora 9 Beta exceeded my expectations when it connected to my wireless network without a hitch ! If the live CD was a girl, I swear I would have married it right then !! :)
The new version of Gnome is working as expected. There are no obvious differences when compared to Gnome 2.20, but I really love the new world clock. Nautilus seems more responsive than usual, even though I am running off a CD. I didn't try to enable the built-in compositing manager, because the default display driver doesn't support direct rendering and frame buffers. All in all, my first impression of Gnome 2.22 is a very good one.
Firefox has never looked this nice ! It's truly a great step forward to have full system integration. Earlier, Firefox was the odd man out as it never followed the system settings. I had to tweak Firefox for hours before it looked decent in Fedora 8, but even then the pages never looked right and fonts always got screwed up. In Fedora 9, Firefox is fully integrated with the system and everything looks great ! Kudos to everyone involved in getting Fedora and Firefox together.
Testing ext4 and NTFS resizing will have to wait until I finally install Fedora 9. But so far from what I have seen, Fedora 9 is going to be one of the best releases in the history of the Fedora project. This is not to say that all previous releases of Fedora were crap. But unlike the users of other distros such as Ubuntu, Fedora users always had to pay a price for being on the bleeding edge. Things always didn't work together and required a lot of tweaking. This is probably what keeps many novice users away from Fedora. However now, Fedora is at least stable enough to go mainstream. Hopefully it will open the eyes of all those Ubuntu fanatics who think that Ubuntu is the only Linux distro in the world.


Friday, 4 April 2008
Monica - Linux Monitor Calibration
My friend over at lokuhetty.blogspot.com recently bought a new LCD monitor and we have been banging our heads together to find a decent monitor calibration tool. Most of the freeware utilities out there are for windows and every tool that we tried was too complicated unless you are an expert photographer/graphic designer.
Monica (http://www.pcbypaul.com/software/monica.html) is a simple utility that works on Linux. Compared to other programs that we tried, monica is very easy for average people like us to use. All you need to do is squint at the image shown and adjust the sliders until the image shows a smooth gray gradient without colour cues.
Installation is easy as well. On my Fedora machine, this is what I did to install monica:
wget http://www.pcbypaul.com/software/dl/monica-3.6.tar.bz2
tar -jxvf monica-3.6.tar.bz2
cd monica-3.6
sudo yum install fltk-devel
make
make install
To run, just type monica
Happy calibrating !

Monica (http://www.pcbypaul.com/software/monica.html) is a simple utility that works on Linux. Compared to other programs that we tried, monica is very easy for average people like us to use. All you need to do is squint at the image shown and adjust the sliders until the image shows a smooth gray gradient without colour cues.
Installation is easy as well. On my Fedora machine, this is what I did to install monica:
wget http://www.pcbypaul.com/software/dl/monica-3.6.tar.bz2
tar -jxvf monica-3.6.tar.bz2
cd monica-3.6
sudo yum install fltk-devel
make
make install
To run, just type monica
Happy calibrating !

Subscribe to:
Posts (Atom)